expendable mold casting
sand casting
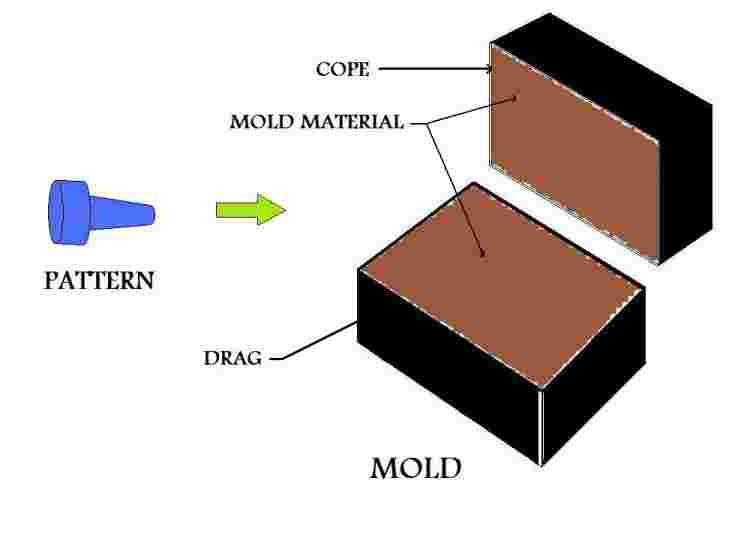
Sand casting, the most widely used casting process, utilizes expendable sand molds to form complex metal parts that can be made of nearly any alloy. Because the sand mold must be destroyed in order to remove the part, called the casting
Sand casting is used to produce a wide variety of metal components with complex geometries. These parts can vary greatly in size and weight, ranging from a couple ounces to several tons. Some smaller sand cast parts include components as gears, pulleys, crankshafts, connecting rods, and propellers. Larger applications include housings for large equipment and heavy machine bases. Sand casting is also common in producing automobile components, such as engine blocks, engine manifolds, cylinder heads, and transmission cases

The process cycle for sand casting consists of six main stages, which are explained below.
- Mold-making - The first step in the sand casting process is to create the mold for the casting. In an expendable mold process, this step must be performed for each casting. A sand mold is formed by packing sand into each half of the mold. The sand is packed around the pattern, which is a replica of the external shape of the casting. When the pattern is removed, the cavity that will form the casting remains. Any internal features of the casting that cannot be formed by the pattern are formed by separate cores which are made of sand prior to the formation of the mold. Further details on mold-making will be described in the next section. The mold-making time includes positioning the pattern, packing the sand, and removing the pattern. The mold-making time is affected by the size of the part, the number of cores, and the type of sand mold. If the mold type requires heating or baking time, the mold-making time is substantially increased. Also, lubrication is often applied to the surfaces of the mold cavity in order to facilitate removal of the casting. The use of a lubricant also improves the flow the metal and can improve the surface finish of the casting. The lubricant that is used is chosen based upon the sand and molten metal temperature.
- Clamping - Once the mold has been made, it must be prepared for the molten metal to be poured. The surface of the mold cavity is first lubricated to facilitate the removal of the casting. Then, the cores are positioned and the mold halves are closed and securely clamped together. It is essential that the mold halves remain securely closed to prevent the loss of any material.
- Pouring - The molten metal is maintained at a set temperature in a furnace. After the mold has been clamped, the molten metal can be ladled from its holding container in the furnace and poured into the mold. The pouring can be performed manually or by an automated machine. Enough molten metal must be poured to fill the entire cavity and all channels in the mold. The filling time is very short in order to prevent early solidification of any one part of the metal.
- Cooling - The molten metal that is poured into the mold will begin to cool and solidify once it enters the cavity. When the entire cavity is filled and the molten metal solidifies, the final shape of the casting is formed. The mold can not be opened until the cooling time has elapsed. The desired cooling time can be estimated based upon the wall thickness of the casting and the temperature of the metal. Most of the possible defects that can occur are a result of the solidification process. If some of the molten metal cools too quickly, the part may exhibit shrinkage cracks, or incomplete sections. Preventative measures can be taken in designing both the part and the mold and will be explored in later sections.
- Removal - After the predetermined solidification time has passed, the sand mold can simply be broken, and the casting removed. This step, sometimes called shakeout, is typically performed by a vibrating machine that shakes the sand and casting out of the flask. Once removed, the casting will likely have some sand and oxide layers adhered to the surface. Shot blasting is sometimes used to remove any remaining .
- Trimming - During cooling, the material from the channels in the mold solidifies attached to the part. This excess material must be trimmed from the casting either manually via cutting or sawing, or using a trimming press. The time required to trim the excess material can be estimated from the size of the casting's envelope A larger casting will require a longer trimming time. The scrap material that results from this trimming is either discarded or reused in the sand casting process. However, the scrap material may need to be reconditioned to the proper chemical composition before it can be combined with non-recycled metal and reused.


shell molding
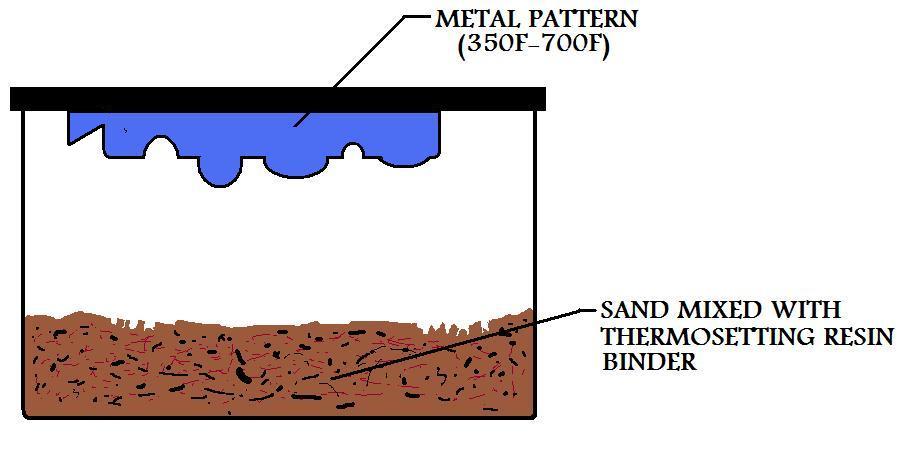
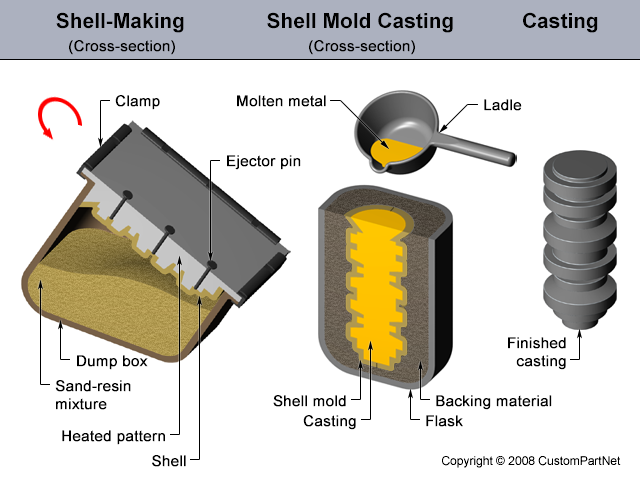
Shell mold casting or shell molding is a metal casting process in manufacturing industry in which the mold is a thin hardened shell of sand and thermosetting resin binder backed up by some other material. Shell molding was developed as a manufacturing process in Germany in the early 1940's.
Shell mold casting is particularly suitable for steel castings under 20 lbs; however almost any metal that can be cast in sand can be cast with shell molding process. Also much larger parts have been manufactured with shell molding. Typical parts manufactured in industry using the shell mold casting process include cylinder heads, gears, bushings, connecting rods, camshafts and valve bodies.
Shell mold casting is particularly suitable for steel castings under 20 lbs; however almost any metal that can be cast in sand can be cast with shell molding process. Also much larger parts have been manufactured with shell molding. Typical parts manufactured in industry using the shell mold casting process include cylinder heads, gears, bushings, connecting rods, camshafts and valve bodies.
The Process
manufacture the shell mold. The sand we use for the shell molding process is of a much smaller grain size than the typical greensand mold. This fine grained sand is mixed with a thermosetting resin binder. A special metal pattern is coated with a parting agent, (typically silicone), which will latter facilitate in the removal of the shell. The metal pattern is then heated to a temperature of 350F-700F degrees, (175C-370C).


The manufacture of the shell mold is now complete and ready for the pouring of the metal casting. In many shell molding processes the shell mold is supported by sand or metal shot during the casting process.
 |
investment casting
Investment casting is a manufacturing process in which a wax pattern is coated with a refractory ceramic material. Once the ceramic material is hardened its internal geometry takes the shape of the casting. The wax is melted out and molten metal is poured into the cavity where the wax pattern was. The metal solidifies within the ceramic mold and then the metal casting is broken out. This manufacturing technique is also known as the lost wax process. Investment casting was developed over 5500 years ago and can trace its roots back to both ancient Egypt and China. Parts manufactured in industry by this process include dental fixtures, gears, cams, ratchets, jewelry, turbine blades, machinery components and other parts of complex geometry.
The Process

The first step in investment casting is to manufacture the wax pattern for the process. The pattern for this process may also be made from plastic; however it is often made of wax since it will melt out easily and wax can be reused
Since the mold does not need to be opened castings of very complex geometry can be manufactured. Several wax patterns may be combined for a single casting. Or as often the case, many wax patterns may be connected and poured together producing many castings in a single process. This is done by attaching the wax patterns to a wax bar, the bar serves as a central sprue. A ceramic pouring cup is attached to the end of the bar. This arrangement is called a tree, denoting the similarity of casting patterns on the central runner beam to branches on a tree.
The casting pattern is then dipped in a refractory slurry whose composition includes extremely fine grained silica, water, and binders. A ceramic layer is obtained over the surface of the pattern. The pattern is then repeatedly dipped into the slurry to increase the thickness of the ceramic coat. In some cases the pattern may be placed in a flask and the ceramic slurry poured over it.
Once the refractory coat over the pattern is thick enough it is allowed to dry in air in order to harden
The next step in this manufacturing process is the key to investment casting. The hardened ceramic mold is turned upside down and heated to a temperature of around 200F-375F (90C-175C). This causes the wax to flow out of the mold leaving the cavity for the casting.
The ceramic mold is then heated to around 1000F-2000F (550C-1100C). This will further strengthen the mold, eliminate any leftover wax or contaminants, and drive out water from the mold material. The casting is then poured while the mold is still hot. Pouring the casting while the mold is hot allows the liquid metal to flow easily through the mold cavity filling detailed and thin sections. Pouring the casting in a hot mold also gives better dimensional accuracy since the mold and casting will shrink together as they cool.
After pouring of the molten metal into the mold, the casting is allowed to set as the solidification process takes place.
The final step in this manufacturing process involves breaking the ceramic mold from the casting and cutting the parts from the tree.

Carbon Dioxide Mold Casting
CO2 Mold Casting - A sand casting process employing a molding mixture of sand and a liquid silicate binder. The molding mixture is hardened by blowing carbon dioxide gas through it.
Synonyms: carbon dioxide mold casting, carbon dioxide mould casting, CO2 mould casting process

lost foam casting

The lost foam casting (LFC) process originated in 1958 when H.F. Shroyer was granted a patent for the cavity-less method, using a polystyrene foam pattern imbedded in traditional green sand. The polystyrene foam pattern left in the sand is decomposed by molten metal. The molten metal replaces the foam pattern and precisely duplicates all of the
The Casting Process
- A pattern is made from expanded polystyrene foam. The final pattern is approximately 97.5% air 2.5% polystyrene.
- The foam is coated with ceramic investment, also known as refractory coating, by dipping, brushing, spraying or flow coating. The coating creates a barrier between the smooth foam surface and the coarse sand surface. The coating also controls permeability, which allows the gas created by the vaporized foam pattern to escape through the coating into the sand. The coating foams a barrier so that the molten metal does not penetrate of cause sand erosion during pouring.
- After the coating dries, the cluster is placed into a flask and backed up with un-bonded sand. The sand is then compacted using a vibration table. Once compacted the mold is ready to be poured.
- Molten metal is then poured into the EPS pattern, which vaporizes and is replaced by metal. Vents in the side of the flask allow vapor to escape.
- The ceramic investment is then removed, revealing the metal part.

Plaster Mold Casting
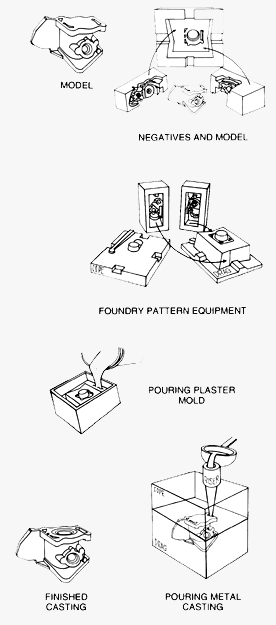
Plaster mold casting, also called rubber plaster molding (RPM), is a method of producing aluminum or zinc castings by pouring liquid metal into plaster (gypsum) molds.
Step 1: Model or Master Pattern
- Constructed from customer drawing or CAD file.
- Stereolithography, traditional hand crafted or machined.
- Model is engineered to include:
A) Metal shrinkage.
B) Mold taper (if required)
C) Machine stock (if required). - We can "clone" or adapt customer supplied model if requested.
Step 2: Foundry Pattern Equipment
- Negative molds are made from model.
- Core plugs are made from negative molds.
- A positive resin cope and drag pattern is now made from the negative molds.
- Core boxes are made from the core plugs
- Gating, runner system and flasks are added as necessary.
- Duplicate sets of tooling can be made from the master negative.
Step 3: Plaster Mold
- A liquid plaster slurry is poured around the cope and drag pattern and into the core boxes.
- The plaster mold is next removed from the cope and drag patterns.
- The plaster mold and cores are then baked to remove moisture.
Step 4: Pour Casting
- Molten metal is prepared by degassing, and a spectrographic sample is taken to check the chemical analysis.
- The molten metal is then poured into the assembled plaster mold.
- The plaster is removed by mechanical knock-out and high pressure waterjet.
- When the casting has cooled, the gates and risers are then removed.
Step 5: Secondary Operations
- The raw castings are inspected and serialized.
- Castings may then require (per customer specifications):
A) Heat treatment
B) X-Ray
C) Penetrant inspection - After finish inspection, casting is ready for:
A) Machining
B) Chemical film, chromate conversion, paint
or special finishes
C) Assembly
D) Form-in-place gasketing.
The manufacturing process of ceramic mold casting is like the process of plaster mold casting but can cast materials at much higher temperatures. Instead of using plaster to create the mold for the metalcasting, ceramic casting uses refractory ceramics for a mold material. In industry parts such as machining cutters, dies for metalworking, metal molds, and impellers may be manufactured by this process.
The Process
The first step in manufacture by ceramic mold casting is to combine the material for the mold. A mixture of fine grain zircon (ZrSiO4), aluminum oxide, fused silica, bonding agents, and water creates a ceramic slurry . This slurry is poured over the casting pattern and let set. The pattern is then removed and the mold is left to dry. The mold is then fired.
The firing will burn off any unwanted material and make the mold hardened and rigid. The mold may also need to be baked in a furnace as well. The firing of the mold produces a network of microscopic cracks in the mold material. These cracks give the ceramic mold both good permeability and collapsibility for the casting process.

No comments:
Post a Comment