Friday, February 8, 2013

Clutch Coupling

 Clutch Coupling


Clutch used to transmit power by tow shaft, the torque transmitted by friction between disks.


How It Works

Fig.1
 E  -  Input shaft  A  -  Pawl    B - Clutch teeth    C - Sliding compound   D  - Helical Splines  
 F  - Out Clutch                           G - ratchet teeth
1)- When the input shaft and sliding component reach the same speed as the output, they rotate until a ratchet tooth contacts the tip of a 


 this prevents further rotation of the sliding component relative to the output clutch ring (position shown).
Fig.2
2)- As the sliding component moves along the input shaft, the pawl passes out of contact with the ratchet tooth, allowing the clutch teeth to come into flank contact and continue the engaging travel. Note that the only load on the pawl is that required to shift the lightweight sliding component along the helical splines.
Fig.3
 3)-Driving torque from the input shaft will only be transmitted when the sliding component completes its travel by contacting an end stop on the input shaft , with the clutch teeth fully engaged and pawls unloaded


Couplings


coupling

 is a device used to connect two shafts together at their ends for the purpose of transmitting power. Couplings do not normally allow disconnection of shafts during operation, however there are tourqe limiting  couplings which can slip or disconnect when some torque limit is exceeded The primary purpose of couplings is to join two pieces of rotating equipment while permitting some degree of misalignment or end movement or both. By careful selection, installation and maintenance of couplings, substantial savings can be made in reduced maintenance costs and downtime.


Shaft couplings are used in machinery for several purposes:-


1) - To transmit power between two shafts.
2) - To reduce the transmission of shock loads from one shaft to another.

3)- To provide for the connection of shafts of units that are  manufactured separately such as a motor and generator and to provide for disconnection for repairs or alternations
 4)-To introduce protection against overloads


 main types of coupling 


rigid coupling and flexible coupling.


rigid coupling :


Rigid couplings are mainly used to connect shafts In perfect alignment. The smallest degree of misalignment will cause considerable stress on the coupling


torsional rigid coupling


  Flexible coupling :

Flexible couplings are designed to transmit tourqe  while permitting some radial, axial, and angular misalignment. Flexible couplings can accommodate (damping) angular misalignment up to a few degrees and 
some parallel misalignment


Grid coupling


chain coupling :


Helical coupling:


Welding Processes


Welding Processes


The manufacture of virtually all sophisticated modern products involves joining together many individual components. Where a permanent join is required, welding is often a good option. Other possible processes such as brazing, soldering, and use of adhesives will are considered in the Design module.
Welding processes can be split into two broad categories:

Fusion processes


The surfaces of two components to be joined are cleaned, placed close together and heated while being protected from oxidation. A pool of molten metal forms and connects the components, a filler rod may be used to add metal to the joint.
This category covers a very wide range of processes, some of which are considered in more detail later

Solid phase processes


The metals to be joined do not melt, they are heated, usually by friction heating generated by sliding the parts together under a normal load, this softens the metals and removes surface contamination. The sliding is then stopped, the normal load is increased and the two surfaces join together.
Friction welding is the main process in this class and is widely used to join axisymmetric components in two different types of steels. Examples include engine valves where a heat resistant alloy head is required, but a steel that will slide well in the guide is needed for the stem.


Types of Welds

FilletGroove
Filletgroove
Plug Or SlotArc Seam Or Spot
plug or slotarc seam or spot
Surfacing
surfacing

Welding Positions

Fillet Weld

Flat PositionHorizontal Position
flat positionhorizontal position
Vertical PositionOverhead Position
vertical positionoverhead position

Groove Weld

Flat PositionHorizontal Position
groove flat positiongroove horizontal position
Vertical PositionOverhead Position
groove vertical positiongroove overhead position
pipe horizontalpipe vertical
pipe inclined


Saturday, February 2, 2013

Sand Casting Defects:

Sand Casting Defects:


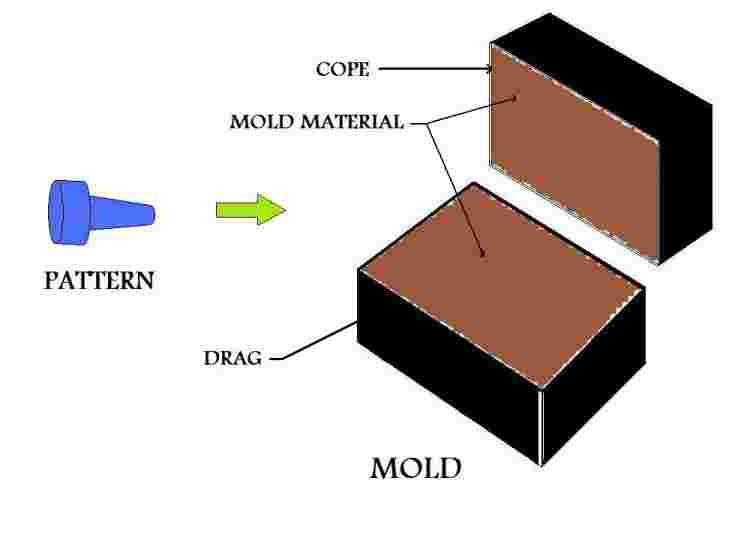
• Production of castings involves a large number of steps including casting design, pattern making, moulding, melting, pouring, shake out, fettling, inspection and finishing.
• It is not uncommon for one or more of these steps to be performed unsatisfactorily due to use of defective material or equipment, carelessness of the operator or lack of skill.
• Such unsatisfactory operations result in a defective casting which may be rejected at the final stage.
• Since reclamation of defective castings is often costly and sometimes outright impossible, care should be taken to avoid the occurrence of the defects in the first instance.
• It is therefore necessary to understand the various defects that occur in sand castings and the main factors that are responsible for their occurrence.
• Some of the common defects are described below.
1. Open Blows and Blow Holes
2. Pin Hole Porosity
3. Entrapped Air and other gases
4. Cracked Casting
5. Bent or Twisted Casting
6. Dropped Mould
7. Fusion
8. Swell
9. Run out
10. Mismatch
11. Mis-run and Cold Shut
12. Shrinkage-Faults
13. Rat Tail and Buckles
14. Core Shift
15. Inclusions
16. Cuts and Washes
17. Metal penetration
18. Hard Spots
19. Scabs
20. Hot tears


Misrun and Cold Shut:
• A misrun is caused when the section thickness of a casting is so small or the pouring temperature so low that the entire section is not filled before the metal solidifies.
01-casting defects-misrun
• Cold shut is caused when two streams of metal which are too cold meet but do not fuse together.
01-casting defects-cold shut


and the remedy is :

Misrun and cold shut can be minimized by proper design of casting, providing suitable gating and risering and using correct temperature of the melt.


Shrinkage Faults:
• Shrinkage faults are faults caused by improper directional solidifications, poor gating and risering design and inadequate feeding.
• Solidification leads to volumetric contraction which must be compensated by feeding. If this compensation is inadequate either surface shrinkage or internal shrinkage defects are produced making the casting weaker.
• Shrinkage faults can be reduced by providing proper gating system, pouring at correct temperature and taking care of directional solidification.
OLYMPUS DIGITAL CAMERA


and remedy is :

Shrinkage faults can be reduced by providing proper gating system, pouring at correct temperature and taking care of directional solidification


Rat Tail and Buckles:
• Rat tails and buckles are caused by the expansion of a thin outer layer of moulding sand on the surface of the mould cavity due to metal heat.
• A rat tail is caused by depression of a part of the mould under compression which appears as an irregular line on the surface of the casting.
• A buckle is a more severe failure of the sand surface under compression.
• The mould must provide for proper expansion instead of forming compressed layers to avoid this defect.
01-bent casting-twisted casting-casting defects

and remedy is :

The remedy is to provide suitable allowances on the pattern, controlling deformation by providing suitable ribs etc. and plan for uniform cooling rate.


Core Shift:
• A core shift results from improper support or location of a core.
• It results in a faulty cavity or hole in the casting.
• It can be reduced by providing proper support for cores and correct alignment with the mould.
01-casting defects-mismatch


Inclusions:
• Inclusions are any foreign materials present in the cast metal.
• These may be in the form of oxides, slag, dirt, sand or nails.
• Common sources of these inclusions are impurities with the molten metal, sand and dirt from the mould not properly cleaned, break away sand from mould, core or gating system, gas from the metal and foreign items picked on the mould cavity while handling.
• Inclusions are reduced by using correct grade of moulding sand and proper skimming to remove impurities.
01-Casting Inclusion-casting defects
Cuts and Washes:
• Cuts and washes are caused by erosion of mould and core surfaces by the metal flowing in the mould cavity.
• These defects are avoided by proper ramming, having sand of required strength and controlling the turbulence during pouring.
01-casting defects-wash
Metal penetration:
• If the sand grains used are very coarse or the metal poured has very high temperature the metal is able to enter the spaces between sand grains to some distance. Such sand becomes tightly wedged in the metal and is difficult to remove.
• The remedy is to remove the causes mentioned above.
01-casting defects-flash
Hard Spots:
• Hard spots are caused by chilling action of moulding sands in some metals like gray cast iron with insufficient silicon.
• These spots are extremely hard and often lead to machining difficulties.
• Hard spots are avoided by providing uniform cooling and pouring at the right temperature.
Scabs:
• Scabs are rough, irregular projections on surface of castings containing embedded sand.
• Scabs occur when a portion on the face of mould or core lifts and metal flows underneath in a thin layer.
• They are caused by using too fine sand grains or using sand of low permeability or moisture content.
• They may also be caused by uneven mould ramming or by intense local overheating.
• Scabs can be reduced by mixing additives like sea coal, wood flour or dextrin in the sand, providing uniform ramming and pouring with correct velocity.
01-casting defects-scab
Hot tears:
• Hot tears are ragged irregular internal or external cracks occurring immediately after the metal have solidified.
• Hot tears occur on poorly designed castings having abrupt section changes or having no proper fillets or corner radii. Wrongly placed chills.
• Improper placement of gates and risers or incorrect pouring temperatures can also produce hot tears.
01-casting defects-hot tear
• Hot tears are also caused by poor collapsibility of cores.
• If the core does not collapse when the casting is contracting over it stresses will be set up in the casting leading to its failure.
• Hot tears can be eliminated by improved design, proper directional solidification, and uniform rate of cooling, correct pouring temperature and control of mould hardness.
01-casting defects-casting hot tear


Permanent Mold Casting

Permanent Mold Casting


 the Advantages of using the Permanent Mold Casting Process: 

  • Able to produce complex shapes and designs
  •  Finer grain structure
  •  Better mechanical properties including strength of casting
  •  Able to achieve a higher as-cast surface finish over the sand casting process
  •  High volume production runs
  •  Precise and consistent control over dimensional attributes
  •  Increased repeatability of casting
  •  High quality of surface finish on as-cast products
  • Improved definition and detail within parts
  •  Ability to design thinner wall thicknesses
  •  Competitively priced casting production


1-Die Casting:


Die casting is a manufacturing process that can produce geometrically complex metal parts through the use of reusable molds, called dies. The die casting process involves the use of a furnace, metal, die casting machine, and die. The metal, typically a non-ferrous alloy such as aluminum or zinc, is melted in the furnace and then injected into the dies in the die casting machine.

there are two types of die casting 

the first    hot chamber die casting :


Hot chamber casting machines use an oil or gas powered piston to drive the molten metal heated within the machine into the die. The piston pulls back allowing the molten metal to fill what is called the “goose neck” once the liquid metal has filled the goose neck the piston can then force the liquid metal into the die


the second type is 

cold chamber die casting :


Cold chamber casting machines do not heat the metal, the molten metal must be ladled into the cold chamber manually or by an automatic ladle system, the molten metal is then forced into the die by a hydraulic piston at high pressure.


expendable mold casting

expendable mold casting


sand casting 

Sand casting, the most widely used casting process, utilizes expendable sand molds to form complex metal parts that can be made of nearly any alloy. Because the sand mold must be destroyed in order to remove the part, called the casting


Sand casting is used to produce a wide variety of metal components with complex geometries. These parts can vary greatly in size and weight, ranging from a couple ounces to several tons. Some smaller sand cast parts include components as gears, pulleys, crankshafts, connecting rods, and propellers. Larger applications include housings for large equipment and heavy machine bases. Sand casting is also common in producing automobile components, such as engine blocks, engine manifolds, cylinder heads, and transmission cases
 

The process cycle for sand casting consists of six main stages, which are explained below.

  1. Mold-making - The first step in the sand casting process is to create the mold for the casting. In an expendable mold process, this step must be performed for each casting. A sand mold is formed by packing sand into each half of the mold. The sand is packed around the pattern, which is a replica of the external shape of the casting. When the pattern is removed, the cavity that will form the casting remains. Any internal features of the casting that cannot be formed by the pattern are formed by separate cores which are made of sand prior to the formation of the mold. Further details on mold-making will be described in the next section. The mold-making time includes positioning the pattern, packing the sand, and removing the pattern. The mold-making time is affected by the size of the part, the number of cores, and the type of sand mold. If the mold type requires heating or baking time, the mold-making time is substantially increased. Also, lubrication is often applied to the surfaces of the mold cavity in order to facilitate removal of the casting. The use of a lubricant also improves the flow the metal and can improve the surface finish of the casting. The lubricant that is used is chosen based upon the sand and molten metal temperature.
  2. Clamping - Once the mold has been made, it must be prepared for the molten metal to be poured. The surface of the mold cavity is first lubricated to facilitate the removal of the casting. Then, the cores are positioned and the mold halves are closed and securely clamped together. It is essential that the mold halves remain securely closed to prevent the loss of any material.
  3. Pouring - The molten metal is maintained at a set temperature in a furnace. After the mold has been clamped, the molten metal can be ladled from its holding container in the furnace and poured into the mold. The pouring can be performed manually or by an automated machine. Enough molten metal must be poured to fill the entire cavity and all channels in the mold. The filling time is very short in order to prevent early solidification of any one part of the metal.
  4. Cooling - The molten metal that is poured into the mold will begin to cool and solidify once it enters the cavity. When the entire cavity is filled and the molten metal solidifies, the final shape of the casting is formed. The mold can not be opened until the cooling time has elapsed. The desired cooling time can be estimated based upon the wall thickness of the casting and the temperature of the metal. Most of the possible defects that can occur are a result of the solidification process. If some of the molten metal cools too quickly, the part may exhibit shrinkage  cracks, or incomplete sections. Preventative measures can be taken in designing both the part and the mold and will be explored in later sections.
  5. Removal - After the predetermined solidification time has passed, the sand mold can simply be broken, and the casting removed. This step, sometimes called shakeout, is typically performed by a vibrating machine that shakes the sand and casting out of the flask. Once removed, the casting will likely have some sand and oxide layers adhered to the surface. Shot blasting is sometimes used to remove any remaining .
  6. Trimming - During cooling, the material from the channels in the mold solidifies attached to the part. This excess material must be trimmed from the casting either manually via cutting or sawing, or using a trimming press. The time required to trim the excess material can be estimated from the size of the casting's envelope  A larger casting will require a longer trimming time. The scrap material that results from this trimming is either discarded or reused in the sand casting process. However, the scrap material may need to be reconditioned to the proper chemical composition before it can be combined with non-recycled metal and reused.


shell molding


Shell mold casting or shell molding is a metal casting process in manufacturing industry in which the mold is a thin hardened shell of sand and thermosetting resin binder backed up by some other material. Shell molding was developed as a manufacturing process in Germany in the early 1940's.

Shell mold casting is particularly suitable for steel castings under 20 lbs; however almost any metal that can be cast in sand can be cast with shell molding process. Also much larger parts have been manufactured with shell molding. Typical parts manufactured in industry using the shell mold casting process include cylinder heads, gears, bushings, connecting rods, camshafts and valve bodies.


The Process


 manufacture the shell mold. The sand we use for the shell molding process is of a much smaller grain size than the typical greensand mold. This fine grained sand is mixed with a thermosetting resin binder. A special metal pattern is coated with a parting agent, (typically silicone), which will latter facilitate in the removal of the shell. The metal pattern is then heated to a temperature of 350F-700F degrees, (175C-370C). 


The manufacture of the shell mold is now complete and ready for the pouring of the metal casting. In many shell molding processes the shell mold is supported by sand or metal shot during the casting process.


investment casting 


Investment casting is a manufacturing process in which a wax pattern is coated with a refractory ceramic material. Once the ceramic material is hardened its internal geometry takes the shape of the casting. The wax is melted out and molten metal is poured into the cavity where the wax pattern was. The metal solidifies within the ceramic mold and then the metal casting is broken out. This manufacturing technique is also known as the lost wax process. Investment casting was developed over 5500 years ago and can trace its roots back to both ancient Egypt and China. Parts manufactured in industry by this process include dental fixtures, gears, cams, ratchets, jewelry, turbine blades, machinery components and other parts of complex geometry.


The Process


The first step in investment casting is to manufacture the wax pattern for the process. The pattern for this process may also be made from plastic; however it is often made of wax since it will melt out easily and wax can be reused


Since the mold does not need to be opened castings of very complex geometry can be manufactured. Several wax patterns may be combined for a single casting. Or as often the case, many wax patterns may be connected and poured together producing many castings in a single process. This is done by attaching the wax patterns to a wax bar, the bar serves as a central sprue. A ceramic pouring cup is attached to the end of the bar. This arrangement is called a tree, denoting the similarity of casting patterns on the central runner beam to branches on a tree.


The casting pattern is then dipped in a refractory slurry whose composition includes extremely fine grained silica, water, and binders. A ceramic layer is obtained over the surface of the pattern. The pattern is then repeatedly dipped into the slurry to increase the thickness of the ceramic coat. In some cases the pattern may be placed in a flask and the ceramic slurry poured over it.


Once the refractory coat over the pattern is thick enough it is allowed to dry in air in order to harden


The next step in this manufacturing process is the key to investment casting. The hardened ceramic mold is turned upside down and heated to a temperature of around 200F-375F (90C-175C). This causes the wax to flow out of the mold leaving the cavity for the casting.


The ceramic mold is then heated to around 1000F-2000F (550C-1100C). This will further strengthen the mold, eliminate any leftover wax or contaminants, and drive out water from the mold material. The casting is then poured while the mold is still hot. Pouring the casting while the mold is hot allows the liquid metal to flow easily through the mold cavity filling detailed and thin sections. Pouring the casting in a hot mold also gives better dimensional accuracy since the mold and casting will shrink together as they cool.


After pouring of the molten metal into the mold, the casting is allowed to set as the solidification process takes place.


The final step in this manufacturing process involves breaking the ceramic mold from the casting and cutting the parts from the tree. 


Carbon Dioxide Mold Casting


CO2 Mold Casting - A sand casting process employing a molding mixture of sand and a liquid silicate binder. The molding mixture is hardened by blowing carbon dioxide gas through it.
Synonyms:  carbon dioxide mold casting, carbon dioxide mould casting, CO2 mould casting process


lost foam casting 


The lost foam casting (LFC) process originated in 1958 when H.F. Shroyer was granted a patent for the cavity-less method, using a polystyrene foam pattern imbedded in traditional green sand.  The polystyrene foam pattern left in the sand is decomposed by molten metal.  The molten metal replaces the foam pattern and precisely duplicates all of the 

The Casting Process

  1. A pattern is made from expanded polystyrene foam.  The final pattern is approximately 97.5% air 2.5% polystyrene.
  2. The foam is coated with ceramic investment, also known as refractory coating, by dipping, brushing, spraying or flow coating.  The coating creates a barrier between the smooth foam surface and the coarse sand surface.  The coating also controls permeability, which allows the gas created by the vaporized foam pattern to escape through the coating into the sand. The coating foams a barrier so that the molten metal does not penetrate of cause sand erosion during pouring. 
  3. After the coating dries, the cluster is placed into a flask and backed up with un-bonded sand.  The sand is then compacted using a vibration table.  Once compacted the mold is ready to be poured.
  4. Molten metal is then poured into the EPS pattern, which vaporizes and is replaced by metal.  Vents in the side of the flask allow vapor to escape.
  5. The ceramic investment is then removed, revealing the metal part.


Plaster Mold Casting

Plaster mold casting, also called rubber plaster molding (RPM), is a method of producing aluminum or zinc castings by pouring liquid metal into plaster (gypsum) molds.

Step 1:  Model or Master Pattern

  1. Constructed from customer drawing or CAD file.
  2. Stereolithography, traditional hand crafted or machined.
  3. Model is engineered to include:
      A) Metal shrinkage.
      B) Mold taper (if required)
      C) Machine stock (if required).
  4. We can "clone" or adapt customer supplied model if requested.

Step 2:  Foundry Pattern Equipment

  1. Negative molds are made from model.
  2. Core plugs are made from negative molds.
  3. A positive resin cope and drag pattern is now made from the negative molds.
  4. Core boxes are made from the core plugs
  5. Gating, runner system and flasks are added as necessary.
  6. Duplicate sets of tooling can be made from the master negative.

Step 3:  Plaster Mold

  1. A liquid plaster slurry is poured around the cope and drag pattern and into the core boxes.
  2. The plaster mold is next removed from the cope and drag patterns.
  3. The plaster mold and cores are then baked to remove moisture.

Step 4:  Pour Casting

  1. Molten metal is prepared by degassing, and a spectrographic sample is taken to check the chemical analysis.
  2. The molten metal is then poured into the assembled plaster mold.
  3. The plaster is removed by mechanical knock-out and high pressure waterjet.
  4. When the casting has cooled, the gates and risers are then removed.

Step 5:  Secondary Operations

  1. The raw castings are inspected and serialized.
  2. Castings may then require (per customer specifications):
      A) Heat treatment
      B) X-Ray
      C) Penetrant inspection
  3. After finish inspection, casting is ready for:
      A) Machining
      B) Chemical film, chromate conversion, paint
          or special finishes
      C) Assembly
      D) Form-in-place gasketing.